Kalcifer

joined 1 year ago
[–] Kalcifer@sh.itjust.works 1 points 14 hours ago

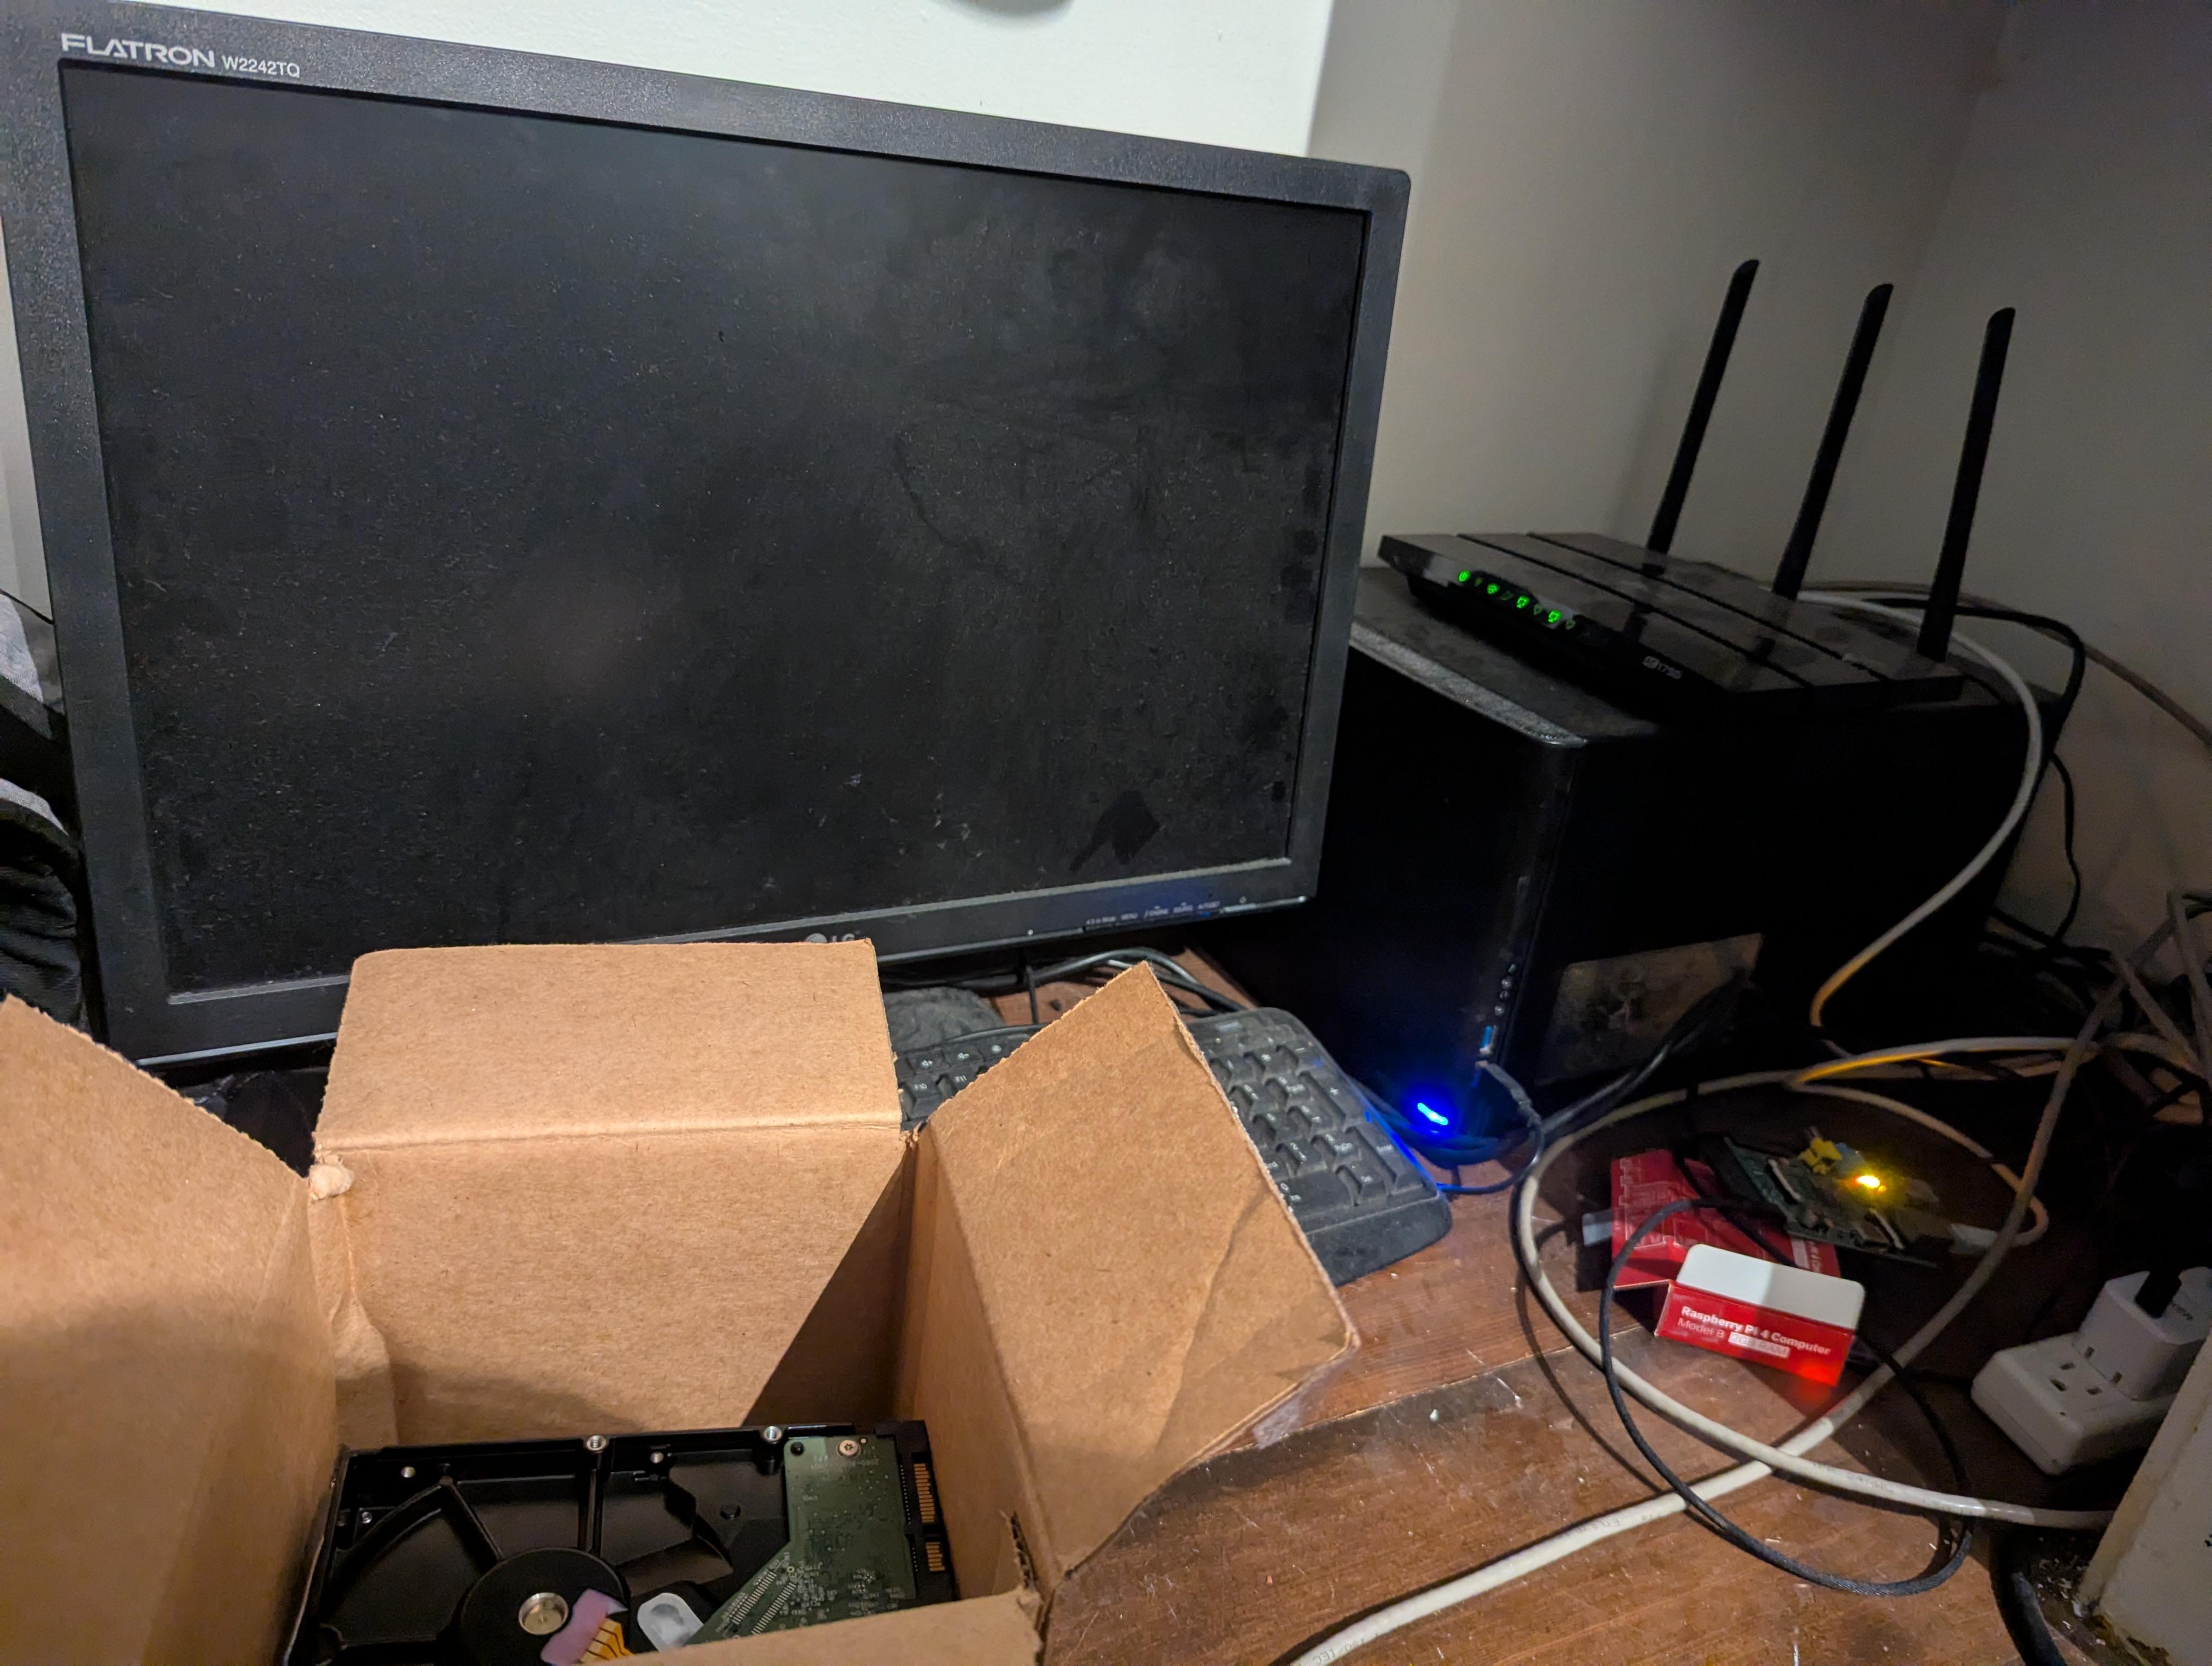
Looks like a Fractal Node 304?

Yep! I've found that the case is possibly a little too cramped for my liking — I'm not overly fond of the placement of the drive bay hangars — but overall it's been alright. It's definitely a nice form factor.

[–] Kalcifer@sh.itjust.works 1 points 14 hours ago

It wasn't a deliberate choice. It was simply hardware that I already had available at the time. I have had no performance issues of note as a result of the hardware's age, so I've seen no reason to upgrade it just yet.

[–] Kalcifer@sh.itjust.works 2 points 2 days ago* (last edited 2 days ago) (4 children)

Main Server

Services

  • Jellyfin
  • FreshRSS
  • Borg
  • Immich
  • Nextcloud AIO
  • RSS-Bridge

Hardware

  • CPU: Intel Core i5-4460
  • GPU: Nvidia GeForce GTX 760
  • Memory: Kingston KHX1600C10D3/8G (8GB DDR3-1600)
  • Motherboard: ASUS H81I-PLUS

OS

  • Ubuntu 22.04.5 LTS

Reverse Proxy

Services

  • Caddy

Hardware

  • Rasbperry Pi 4 Model B Rev 1.5 (2GB)

OS

  • Debian 12

Router

Hardware

  • TP-Link Archer C7 AC1750

OS

  • OpenWRT 23.05.5
[–] Kalcifer@sh.itjust.works 1 points 3 days ago (1 children)

For clarity, I'm not claiming that it would, with any degree of certainty, lead to incurred damage, but the ability to upload unvetted content carries some degree of risk. For there to be no risk, fedi-safety/pictrs-safety would have to be guaranteed to be absolutely 100% free of any possible exploit, as well as the underlying OS (and maybe even the underlying hardware), which seems like an impossible claim to make, but perhaps I'm missing something important.

[–] Kalcifer@sh.itjust.works 1 points 4 days ago (3 children)

"Security risk" is probably a better term. That being said, a security risk can also infer a privacy risk.

[–] Kalcifer@sh.itjust.works 1 points 6 days ago* (last edited 6 days ago) (5 children)

Yeah, that was poor wording on my part — what I mean to say is that there would be unvetted data flowing into my local network and being processed on a local machine. It may be overparanoia, but that feels like a privacy risk.

[–] Kalcifer@sh.itjust.works 1 points 6 days ago (1 children)

You're referring to using only fedi-safety instead of pictrs-safety, as was mentioned in §"For other fediverse software admins", here, right?

[–] Kalcifer@sh.itjust.works 2 points 1 week ago

One thing you’ll learn quickly is that Lemmy is version 0 for a reason.

Fair warning 😆

[–] Kalcifer@sh.itjust.works 2 points 1 week ago

One problem with a big list is that different instances have different ideas over what is acceptable.

Yeah, that would be where being able to choose from any number of lists, or to freely create one comes in handy.

[–] Kalcifer@sh.itjust.works 2 points 1 week ago* (last edited 1 week ago) (3 children)

create from it each day or so yo run on the images since it was last destroyed.

Unfortunately, for this usecase, the GPU needs to be accessible in real time; there is a 10 second window when an image is posted for it to be processed [1].

References

  1. "I just developed and deployed the first real-time protection for lemmy against CSAM!". @db0@lemmy.dbzer0.com. !div0@lemmy.dbzer0.com. Divisions by zero. Published: 2023-09-20T08:38:09Z. Accessed: 2024-11-12T01:28Z. https://lemmy.dbzer0.com/post/4500908.
    • §"For lemmy admins:"

      [...]

      • fedi-safety must run on a system with GPU. The reason for this is that lemmy provides just a 10-seconds grace period for each upload before it times out the upload regardless of the results. [1]

      [...]

[–] Kalcifer@sh.itjust.works 1 points 1 week ago

Probably the best option would be to have a snapshot

Could you point me towards some documentation so that I can look into exactly what you mean by this? I'm not sure I understand the exact procedure that you are describing.

[–] Kalcifer@sh.itjust.works 9 points 1 week ago* (last edited 1 week ago)

[...] if you’re going to run an instance and aren’t already on Matrix, make an account. It’s how instance admins tend to keep in contact with each other.

This is good advice.


If you think this post would be better suited in a different community, please let me know.


Topics could include (this list is not intending to be exhaustive — if you think something is relevant, then please don't hesitate to share it):

  • Moderation
  • Handling of illegal content
  • Server structure (system requirements, configs, layouts, etc.)
  • Community transparency/communication
  • Server maintenance (updates, scaling, etc.)

Cross-posts

  1. https://sh.itjust.works/post/27913098
 

I'm looking for a cheap and portable tablet that I can use for writing. Microsoft Surface Pro tablets, at least around the gen 4 models, are rather cheap to buy used, and they seem decently well made. Naturally, were I to buy one, I would have to install Linux onto it.

I've been peripherally aware of the Linux Surface project for some time now. I looked at it recently, after having not for some time, and it seems that they have really made good progress compared to what I remember, and it's making me much more interested in trying to install Linux on a Surface Pro.

Having never owned a Surface Pro, I'm not sure which models are the most reliable and sturdy. I'm not looking for something that's the flashiest; I want something that works well. I want something pragmatic — something akin to the idea of an older era of Thinkpad (eg T460). I want a pen with low input delay and good accuracy, reliable and responsive touch controls, and a decent display. I was thinking the Surface Pro 4 might be a good choice, but it's hard to know as there aren't many videos out there of people installing Linux on them, so I'm wondering what your experience has been with Microsoft Surface Pro's and installing Linux on one.


Cross-posts:


References


Cross-posted from: https://sh.itjust.works/post/19987854


We have previously highlighted the importance of not losing your account number, encouraging it to be written down in a password manager or similar safe location.

For the sake of convenience account numbers have been visible when users logged into our website. This had led to there being potential concerns where a malicious observer could:

  • Use up all of a user's connections
  • Delete a user's devices

From the 3rd June 2024 you will no longer be able to see your account number after logging into our website.


Danish banks have implemented significant restrictions on how Danish kroner (DKK) used outside Denmark can be repatriated back into Denmark.

Due to these circumstances, which are unfortunately beyond Mullvad’s control, Mullvad will no longer be able to accept DKK from its customers. We will continue to credit DKK received until the end of the month, but considering postal delays, it is best to stop sending it immediately.


An Australian man has been freed after spending 36 hours trapped in a drain network.

He first entered a drain in Brisbane on Saturday "while trying to retrieve his phone", according to authorities.


I thought I'd share my experience doing this, as it was quite a pain, and maybe this will help someone else. It contains the process I took to set it all up, and the workarounds, and solutions that I found along the way.

  1. Hardware that I used: Raspberry Pi 1 Model B rev 2.0, SanDisk Ultra SD Card (32GB).
  2. I had issues using the Raspberry Pi Imager (v1.8.5, Flatpak): It initially flashed pretty quickly, but the verification process was taking an unreasonably long time — I waited ~30mins before giving up, and cancelling it; so, I ended up manually fashing the image to the SD card:
    1. I connected the SD card to a computer (running Arch Linux).
    2. I located what device corresponded to it by running lsblk (/dev/sdd, in my case).
    3. I downloaded the image from here. I specifically chose the "Raspberry Pi OS Lite" option, as it was 32-bit, it had Debian Bookworm, which was the version needed for podman-compose (as seen here), and it lacked a desktop environment, which I wanted, as I was running it headless.
    4. I then flashed the image to the SD card with dd if=<downloaded-raspbian-image> of=<drive-device> BS=50M status=progress
      • <downloaded-raspbian-image> is the path to the file downloaded from step 3.
      • <drive-device> is the device that corresponds to the SD card, as found in step 2.2.
      • BS=50M I found that 50M is an adequately sized buffer size. I tested some from 1M to 100M.
      • status=progress is a neat option that shows you the live status of the command's execution (write speed, how much has been written, etc.).
  3. I enabled SSH for headless access. This was rather poorly documented (which was a theme for this install).
    1. To enable SSH, as noted here, one must put an empty file named ssh at the "root of the SD card". This is, unfortunately, rather misleading. What one must actually do is put that file in the root of the boot partition. That is not to say the directory /boot contained in the root partition, rootfs, but, instead, it must be placed within the boot partition, bootfs (bootfs, and rootfs are the two partitions written to the SD card whe you flash the downloaded image). So the proper path would be <bootfs>/ssh. I simply mounted bootfs within my file manager, but, without that, I would have had to manually locate which partition corresponded to that, and mount it manually to be able to create the file. The ownership of the file didn't seem to matter — it was owned by my user, rather than root (as was every other file in that directory, it seemed).
    2. One must then enable password authentication in the SSH daemon, otherwise one won't be able to connect via SSH using a password (I don't understand why this is not the default):
      1. Edit <bootfs>/etc/ssh/sshd_config
      2. Set PasswordAuthentication yes (I just found the line that contained PasswordAuthentication, uncommented the line, and set it to yes).
  4. I changed the hostname by editing <rootfs>/etc/hostname and replacing it with one that I wanted.
  5. I created a user (the user is given sudo priveleges automatically)
    1. Create a file at <bootfs>/userconf.txt — that is, create a file named userconf.txt in the bootfs partition (again, poorly documented here).
    2. As mentioned in that documentation, add a single line in that file of the format `:, where
      • <username> is the chosen username for the user.
      • <password> is the salted hash of your chosen password, which is generated by running openssl passwd -6 and following its prompts.
  6. Plug the SD card into the Pi, plug in power, and wait for it to boot. This is an old Pi, so it takes a good minute to boot fully and become available. You can ping it with ping <hostname>.local to see when it comes online (where <hostname> is yor chosen hostname).
  7. SSH into the Pi with ssh <username>@<hostname>.local (You'll of course need mDNS, like Avahi, setup on your device running SSH).
  8. Make sure that everything is updated on the Pi with sudo apt update && sudo apt upgrade
  9. Install Podman with sudo apt install podman (the socket gets automatically started by apt).
  10. Install Podman Compose with sudo apt install podman-compose.
  11. Create the compose file compose.yaml. Written using the official as reference, it contains the following:
version: "3"
services:
  pihole:
    container_name: pihole
    image: docker.io/pihole/pihole:latest
    ports:
      - "<host-ip>:53:53/tcp"
      - "<host-ip>:53:53/udp"
      - "80:80/tcp"
    environment:
      TZ: '<your-tz-timezone>'
    volumes:
      - './etc-pihole:/etc/pihole'
      - './etc-dnsmasq.d:/etc/dnsmasq.d'
  • <host-ip> is the ip of the device running the container. The reason for why this is needed can be found in the solution of this post.
  • <your-tz-timezone> is your timezone as listed here.
  • For the line that contains image: docker.io/pihole/pihole:latest, docker.io is necessary, as Podman does not default to using hub.docker.com.
  • Note that there isn't a restart: unless-stopped policy. Apparently, podman-compose currently doesn't support restart policies. One would have to create a Systemd service (which I personally think is quite ugly to expect of a user) to be able to restart the service at boot.
  1. (NOTE: if you wan't to skip step 13, run this command as sudo) Pull the image with podman-compose --podman-pull-args="--arch=arm/v6" pull
    • --podman-pull-args="--arch=arm/v6" is necessary as podman-compose doesn't currently support specifying the platform in the compose file.
      • Specifying the architecture itself is required as, from what I've found, Podman appears to have a bug where it doesn't properly recognize the platform of this Pi, so you have to manually specify which architecture that it is i.e. armv6 (you can see this architecture mentioned here under "latest").
    • This took a little while on my Pi. The download rate was well below my normal download rate, so I assume the single threaded CPU is just being too bogged down to handle a high download rate.
    • Don't be concerned if it stays at the "Copying blob..." phase for a while. This CPU is seriously slow.
  2. Allow podman to use ports below 1024, so that it can run rootless:
    • Edit /etc/sysctl.conf, and add the line net.ipv4.ip_unprivileged_port_start=53. This allows all non-priveleged users to access ports >=53. Not great, but it's what's currently needed. You can avoid this step by running step 12, and 14 as sudo.
    • Apply this with sysctl -p
  3. (NOTE: if you wan't to skip step 13, run this command as sudo) Start the container with podman-compose up -d.
    • It will take a while to start. Again, this Pi is slow.
    • Don't worry if podman-compose ps shows that the container is "unhealthy". This should go away after about a minute, or so. I think it's just in that state while it starts up.
  4. Access the Pihole's admin panel in a browser at http://<host-ip>/admin.
    • The password is found in the logs. You can find it with podman-compose logs | grep random. The password is randomly generated everytime the container starts. If you want to set your own password, then you have to specify it in the compose file as mentioned here.
 

Solution

It was found (here, and here) that Podman uses its own DNS server, aardvark-dns which is bound to port 53 (this explains why I was able to bind to 53 with nc on the host while the container would still fail). So the solution is to bridge the network for that port. So, in the compose file, the ports section would become:

ports:
  - "<host-ip>:53:53/tcp"
  - "<host-ip>:53:53/udp"
  - "80:80/tcp"

where <host-ip> is the ip of the machine running the container — e.g. 192.168.1.141.


Original Post

I so desperately want to bash my head into a hard surface. I cannot figure out what is causing this issue. The full error is as follows:

Error: cannot listen on the UDP port: listen udp4 :53: bind: address already in use

This is my compose file:

version: "3"
services:
  pihole:
    container_name: pihole
    image: docker.io/pihole/pihole:latest
    ports:
      - "53:53/tcp"
      - "53:53/udp"
      - "80:80/tcp"
    environment:
      TZ: '<redacted>'
    volumes:
      - './etc-pihole:/etc/pihole'
      - './etc-dnsmasq.d:/etc/dnsmasq.d'
    restart: unless-stopped

and the result of # ss -tulpn:

Netid       State        Recv-Q       Send-Q                             Local Address:Port               Peer Address:Port       Process                                         
udp         UNCONN       0            0                    [fe80::e877:8420:5869:dbd9]:546                           *:*           users:(("NetworkManager",pid=377,fd=28))       
tcp         LISTEN       0            128                                      0.0.0.0:22                      0.0.0.0:*           users:(("sshd",pid=429,fd=3))                  
tcp         LISTEN       0            128                                         [::]:22                         [::]:*           users:(("sshd",pid=429,fd=4))        

I have looked for possible culprit services like systemd-resolved. I have tried disabling Avahi. I have looked for other potential DNS services. I have rebooted the device. I am running the container as sudo (so it has access to all ports). I am quite at a loss.

  • Raspberry Pi Model 1 B Rev 2
  • Raspbian (bookworm)
  • Kernel v6.6.20+rpt-rpi-v6
  • Podman v4.3.1
  • Podman Compose v1.0.3

EDIT (2024-03-14T22:13Z)

For the sake of clarity, # netstat -pna | grep 53 shows nothing on 53, and # lsof -i -P -n | grep LISTEN shows nothing listening to port 53 — the only listening service is SSH on 22, as expected.

Also, as suggested here, I tried manually binding to port 53, and I was able to without issue.


I use nftables to set my firewall rules. I typically manually configure the rules myself. Recently, I just happened to dump the ruleset, and, much to my surprise, my config was gone, and it was replaced with an enourmous amount of extremely cryptic firewall rules. After a quick examination of the rules, I found that it was Docker that had modified them. And after some brief research, I found a number of open issues, just like this one, of people complaining about this behaviour. I think it's an enourmous security risk to have Docker silently do this by default.

I have heard that Podman doesn't suffer from this issue, as it is daemonless. If that is true, I will certainly be switching from Docker to Podman.

112
submitted 8 months ago* (last edited 8 months ago) by Kalcifer@sh.itjust.works to c/selfhosted@lemmy.world
 

My Nextcloud has always been sluggish — navigating and interacting isn't snappy/responsive, changing between apps is very slow, loading tasks is horrible, etc. I'm curious what the experience is like for other people. I'd also be curious to know how you have your Nextcloud set up (install method, server hardware, any other relevent special configs, etc.). Mine is essentially just a default install of Nextcloud Snap.

Edit (2024-03-03T09:00Z): I should clarify that I am specifically talking about the web interface and not general file sync capabilites. Specifically, I notice the sluggishness the most when interacting with the calendar, and tasks.


Cross-posted to: https://sh.itjust.works/post/14975090


Solution

I'm still not really sure exactly what the root cause of the issue was (I would appreciate it if someone could explain it to me), but I disabled HTTPS on the Nextcloud server

nextcloud.disable-https

and it, all of a sudden, started working. My Caddyfile simply contains the following:

nextcloud.domain.com {
    server-LAN-ip:80
}

Original Post

I am trying to upgrade my existing Nextcloud server (installed as a Snap) so that it is sitting behind a reverse proxy. Originally, The Nextcloud server handled HTTPS with Let's Encrypt at domain.com; now, I would like for Caddy to handle HTTPS with Let's Encrypt at nextcloud.domain.com and to forward the traffic to the Nextcloud server.

With my current setup, I am encountering an error where it is saying 301 Moved Permanently. Does anyone have any ideas on how to fix or troubleshoot this?

Caddyfile:

https://nextcloud.domain.com {
        reverse_proxy 192.168.1.182:443
        header / Strict-Transport-Security max-age=31536000;
}

And here is the output of curl -v https://nextcloud.domain.com/:

* Host nextcloud.domain.com:443 was resolved.
* IPv6: (none)
* IPv4: public-ip
*   Trying public-ip:443...
* Connected to nextcloud.domain.com (public-ip) port 443
* ALPN: curl offers h2,http/1.1
* TLSv1.3 (OUT), TLS handshake, Client hello (1):
*  CAfile: /etc/ssl/certs/ca-certificates.crt
*  CApath: none
* TLSv1.3 (IN), TLS handshake, Server hello (2):
* TLSv1.3 (IN), TLS handshake, Encrypted Extensions (8):
* TLSv1.3 (IN), TLS handshake, Certificate (11):
* TLSv1.3 (IN), TLS handshake, CERT verify (15):
* TLSv1.3 (IN), TLS handshake, Finished (20):
* TLSv1.3 (OUT), TLS change cipher, Change cipher spec (1):
* TLSv1.3 (OUT), TLS handshake, Finished (20):
* SSL connection using TLSv1.3 / TLS_CHACHA20_POLY1305_SHA256 / x25519 / id-ecPublicKey
* ALPN: server accepted h2
* Server certificate:
*  subject: CN=nextcloud.domain.com
*  start date: Feb 21 06:09:01 2024 GMT
*  expire date: May 21 06:09:00 2024 GMT
*  subjectAltName: host "nextcloud.domain.com" matched cert's "nextcloud.domain.com"
*  issuer: C=US; O=Let's Encrypt; CN=R3
*  SSL certificate verify ok.
*   Certificate level 0: Public key type EC/prime256v1 (256/128 Bits/secBits), signed using sha256WithRSAEncryption
*   Certificate level 1: Public key type RSA (2048/112 Bits/secBits), signed using sha256WithRSAEncryption
*   Certificate level 2: Public key type RSA (4096/152 Bits/secBits), signed using sha256WithRSAEncryption
* TLSv1.3 (IN), TLS handshake, Newsession Ticket (4):
* using HTTP/2
* [HTTP/2] [1] OPENED stream for https://nextcloud.domain.com/
* [HTTP/2] [1] [:method: GET]
* [HTTP/2] [1] [:scheme: https]
* [HTTP/2] [1] [:authority: nextcloud.domain.com]
* [HTTP/2] [1] [:path: /]
* [HTTP/2] [1] [user-agent: curl/8.6.0]
* [HTTP/2] [1] [accept: */*]
> GET / HTTP/2
> Host: nextcloud.domain.com
> User-Agent: curl/8.6.0
> Accept: */*
> 
&lt; HTTP/2 301 
&lt; alt-svc: h3="public-ip:443"; ma=2592000
&lt; content-type: text/html; charset=iso-8859-1
&lt; date: Wed, 21 Feb 2024 07:45:34 GMT
&lt; location: https://nextcloud.domain.com:443/
&lt; server: Caddy
&lt; server: Apache
&lt; strict-transport-security: max-age=31536000;
&lt; content-length: 250
&lt; 


301 Moved Permanently

<h1>Moved Permanently</h1>
<p>The document has moved here.</p>

* Connection #0 to host nextcloud.domain.com left intact
 

Cross-posted to: https://sh.itjust.works/post/14975166


Solution

I'm still not really sure exactly what the root cause of the issue was (I would appreciate it if someone could explain it to me), but I disabled HTTPS on the Nextcloud server

nextcloud.disable-https

and, all of a sudden, it started working. My Caddyfile simply contains the following:

nextcloud.domain.com {
    server-LAN-ip:80
}

Original Post

I am trying to upgrade my existing Nextcloud server (installed as a Snap) so that it is sitting behind a reverse proxy. Originally, The Nextcloud server handled HTTPS with Let's Encrypt at domain.com; now, I would like for Caddy to handle HTTPS with Let's Encrypt at nextcloud.domain.com and to forward the traffic to the Nextcloud server.

With my current setup, I am encountering an error where it is saying 301 Moved Permanently. Does anyone have any ideas on how to fix or troubleshoot this?

Caddyfile:

https://nextcloud.domain.com {
        reverse_proxy 192.168.1.182:443
        header / Strict-Transport-Security max-age=31536000;
}

And here is the output of curl -v https://nextcloud.domain.com/:

* Host nextcloud.domain.com:443 was resolved.
* IPv6: (none)
* IPv4: public-ip
*   Trying public-ip:443...
* Connected to nextcloud.domain.com (public-ip) port 443
* ALPN: curl offers h2,http/1.1
* TLSv1.3 (OUT), TLS handshake, Client hello (1):
*  CAfile: /etc/ssl/certs/ca-certificates.crt
*  CApath: none
* TLSv1.3 (IN), TLS handshake, Server hello (2):
* TLSv1.3 (IN), TLS handshake, Encrypted Extensions (8):
* TLSv1.3 (IN), TLS handshake, Certificate (11):
* TLSv1.3 (IN), TLS handshake, CERT verify (15):
* TLSv1.3 (IN), TLS handshake, Finished (20):
* TLSv1.3 (OUT), TLS change cipher, Change cipher spec (1):
* TLSv1.3 (OUT), TLS handshake, Finished (20):
* SSL connection using TLSv1.3 / TLS_CHACHA20_POLY1305_SHA256 / x25519 / id-ecPublicKey
* ALPN: server accepted h2
* Server certificate:
*  subject: CN=nextcloud.domain.com
*  start date: Feb 21 06:09:01 2024 GMT
*  expire date: May 21 06:09:00 2024 GMT
*  subjectAltName: host "nextcloud.domain.com" matched cert's "nextcloud.domain.com"
*  issuer: C=US; O=Let's Encrypt; CN=R3
*  SSL certificate verify ok.
*   Certificate level 0: Public key type EC/prime256v1 (256/128 Bits/secBits), signed using sha256WithRSAEncryption
*   Certificate level 1: Public key type RSA (2048/112 Bits/secBits), signed using sha256WithRSAEncryption
*   Certificate level 2: Public key type RSA (4096/152 Bits/secBits), signed using sha256WithRSAEncryption
* TLSv1.3 (IN), TLS handshake, Newsession Ticket (4):
* using HTTP/2
* [HTTP/2] [1] OPENED stream for https://nextcloud.domain.com/
* [HTTP/2] [1] [:method: GET]
* [HTTP/2] [1] [:scheme: https]
* [HTTP/2] [1] [:authority: nextcloud.domain.com]
* [HTTP/2] [1] [:path: /]
* [HTTP/2] [1] [user-agent: curl/8.6.0]
* [HTTP/2] [1] [accept: */*]
> GET / HTTP/2
> Host: nextcloud.domain.com
> User-Agent: curl/8.6.0
> Accept: */*
> 
&lt; HTTP/2 301 
&lt; alt-svc: h3="public-ip:443"; ma=2592000
&lt; content-type: text/html; charset=iso-8859-1
&lt; date: Wed, 21 Feb 2024 07:45:34 GMT
&lt; location: https://nextcloud.domain.com:443/
&lt; server: Caddy
&lt; server: Apache
&lt; strict-transport-security: max-age=31536000;
&lt; content-length: 250
&lt; 


301 Moved Permanently

<h1>Moved Permanently</h1>
<p>The document has moved here.</p>

* Connection #0 to host nextcloud.domain.com left intact
view more: next ›